Correcting Missing or Incorrectly Labeled Landmarks
Landmarks provide a way to identify the organization and structure of a web page. The structural information conveyed visually to users should be represented programmatically in the markup using landmark roles. The number and type of landmarks that should be used varies but normally each page will have one header, one footer, one main, one search, and one or more navigation and complementary regions. When multiple regions of the same type exist each should include a unique label. opens in a new windowLearn more about ARIA Landmarks
When landmarks do not exist on your website or require labeling the WP ADA Compliance Plugin can be used add them to your pages.
How to Add Landmarks or Correct Missing Landmark Labels
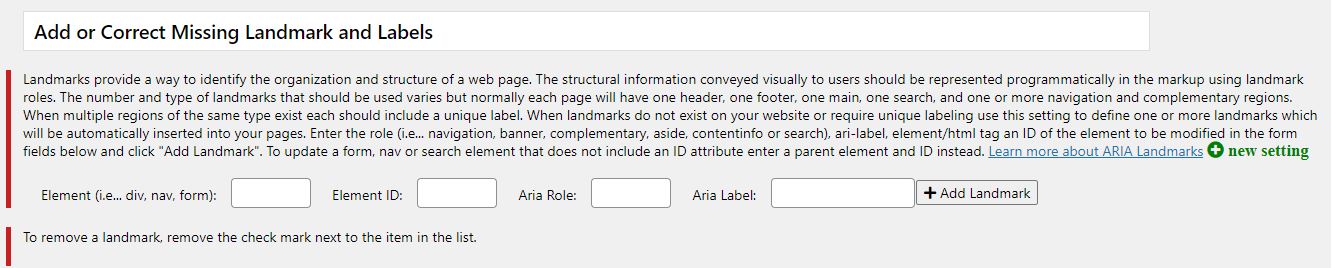
- From the Dashboard menu choose “Web Accessibility > Settings”.
- Click on the “Content Filters” tab.
- Scroll down the page until you see “Add or Correct Missing Landmarks and Labels”.
- Enter the element/html tag to be modified or if the element is a form, search or navigation landmark and does not include an ID enter a parent element that includes a unique ID.
- Enter the unique ID for the html tag entered above.
- Enter the aria-role (i.e… navigation, banner, complementary, aside, contentinfo or search).
- Enter a unique label for the landmark.
- Click “Add Landmark”.
Examples
Adding a missing landmark
The following example is for adding a missing landmark. This particular example is to add a missing Main landmark to a website built using the WordPress Twenty Sixteen theme. In the before example below you will see that a DIV element with an ID set to “main” already exists in the document.
<div id="main" class="site-main">
The following image demonstrates the field values to add the role that will designate this element as a main landmark. Notice that DIV is used as the element and the value of its ID attribute is used. The role is set to “main” and the label field is left blank. Since there is only one main landmark in each page a label would be unnecessary. If this were a navigation landmark or other type of landmark that might be repeated in a document the label would be important.

This is the filtered code, displayed on the website. You will see that a role attribute set to “main” was added.
<div id="main" class="site-main" role="main">
Adding a label to basic WordPress Nav Menu
The following example is for adding a label to a basic WordPress Nav Menu. This particular example is for the menu found in the WordPress Twenty Sixteen theme. In the before example below you will see that the NAV element includes an ID attribute but does not include an aria-label attribute.
<nav id="site-navigation-12" class="main-navigation" role="navigation"> <div class="menu-main-menu-container"><ul id="menu-main-menu" class="primary-menu"><li id="menu-item-31258" class="menu-item menu-item-type-post_type menu-item-object-post menu-item-31258"><a href="https://alumnionlineservices.us/?p=31060">Hello world!</a></li> <li id="menu-item-30711" class="menu-item menu-item-type-custom menu-item-object-custom menu-item-30711"><a href="#">Hello World 2</a></li> </ul></div></nav> The following image demonstrates the field values to add the missing label to this menu. Notice that NAV is used as the element and the value of its ID attribute is used. The role is set to “navigation” and a unique label is entered.

This is the filtered code, displayed on the website. You will see that an aria-label was added to the NAV element.
<nav id="site-navigation-12" class="main-navigation" role="navigation" aria-label="Main Menu"><div class="menu-main-menu-container"><ul id="menu-main-menu" class="primary-menu"><li id="menu-item-31258" class="menu-item menu-item-type-post_type menu-item-object-post menu-item-31258"><a href="https://alumnionlineservices.us/?p=31060">Hello world!</a></li> <li id="menu-item-30711" class="menu-item menu-item-type-custom menu-item-object-custom menu-item-30711"><a href="#">Hello World 2</a></li> </ul></div></nav>Adding a label to an Elementor NAV Menu Widget
The following example is for adding a label to a menu created using the Elementor Nav Menu Widget. In the before example below you will see that the NAV tag does not include an ID attribute, nor does it include an aria-label attribute. Also note that the outer DIV does include an ID attribute. This ID was added in Elementor using the CSS ID field on the advanced tab of the Nav Menu Widget.
<div class="elementor-element elementor-element-a88eb92 elementor-nav-menu--dropdown-tablet elementor-nav-menu__text-align-aside elementor-nav-menu--toggle elementor-nav-menu--burger elementor-widget elementor-widget-nav-menu" data-id="a88eb92" data-element_type="widget" id="my-menuid-1" data-settings="{"layout":"horizontal","submenu_icon":{"value":"<i class=\"fas fa-caret-down\"><\/i>","library":"fa-solid"},"toggle":"burger"}" data-widget_type="nav-menu.default"> <div class="elementor-widget-container">
<nav migration_allowed="1" migrated="0" role="navigation" class="elementor-nav-menu--main elementor-nav-menu__container elementor-nav-menu--layout-horizontal e--pointer-underline e--animation-fade"><ul id="menu-1-a88eb92" class="elementor-nav-menu" data-smartmenus-id="16338645713290618"><li class="menu-item menu-item-type-post_type menu-item-object-page menu-item-31322"><a href="https://alumnionlineservices.us/?page_id=31059" class="elementor-item">Sample Page</a></li> </ul></nav> The following image demonstrates the field values to add the missing label to this menu. Notice the ID and element of the parent element (DIV) are used instead of the NAV element itself. This is important because as noted above the NAV itself does not include an ID attribute. The role is set to “navigation” and a unique label is entered.

This is the filtered code, displayed on the website. You will see that an aria-label was added to the NAV element.
<div class="elementor-element elementor-element-a88eb92 elementor-nav-menu--dropdown-tablet elementor-nav-menu__text-align-aside elementor-nav-menu--toggle elementor-nav-menu--burger elementor-widget elementor-widget-nav-menu" data-id="a88eb92" data-element_type="widget" id="my-menuid-1" data-settings="{"layout":"horizontal","submenu_icon":{"value":"<i class=\"fas fa-caret-down\"><\/i>","library":"fa-solid"},"toggle":"burger"}" data-widget_type="nav-menu.default"> <div class="elementor-widget-container">
<nav migration_allowed="1" migrated="0" role="navigation" class="elementor-nav-menu--main elementor-nav-menu__container elementor-nav-menu--layout-horizontal e--pointer-underline e--animation-fade" aria-label="Sample Menu"><ul id="menu-1-a88eb92" class="elementor-nav-menu" data-smartmenus-id="16338649619464253"><li class="menu-item menu-item-type-post_type menu-item-object-page menu-item-31322"><a href="https://alumnionlineservices.us/?page_id=31059" class="elementor-item">Sample Page</a></li> </ul></nav> Adding a label to a Contact Form 7 form
The following form example is for a form created by the popular Contact Form 7 plugin. In the before example below you will see that the FORM tag does not include an ID attribute, nor does it include an aria-label attribute. Also note that an outer DIV does include an ID attribute.
<div role="form" class="wpcf7" id="wpcf7-f5729-p13-o1" lang="en-US" dir="ltr"> <div class="screen-reader-response"><p role="status" aria-live="polite" aria-atomic="true"></p> <ul></ul></div>
<form action="/contact-us/#wpcf7-f5729-p13-o1" method="post" class="wpcf7-form init" enctype="multipart/form-data" novalidate="novalidate" data-status="init" name="form_61617d92657c5">
The following image demonstrates the field values to add the missing label to this form. Notice the ID and element of the outer element (DIV) are used instead of the form element itself. This is important because as noted above the form itself does not include an ID attribute. The role is set to “form” and a unique label is entered.

This is the filtered code, displayed on the website. You will notice that the role attribute has been removed from the outer DIV and that an aria-label was added to the FORM element.
<div class="wpcf7" id="wpcf7-f5729-p13-o1" lang="en-US" dir="ltr"> <div class="screen-reader-response"><p role="status" aria-live="polite" aria-atomic="true"></p> <ul></ul></div>
<form action="/contact-us/#wpcf7-f5729-p13-o1" method="post" class="wpcf7-form init" enctype="multipart/form-data" novalidate="novalidate" data-status="init" name="form_61617e38db8c9" role="form" aria-label="Contact Us">